Showing posts with label Nail art. Show all posts

Wednesday, September 11, 2013

Nail Art By Work Play Polish

Fashion Inspired Nail Art


Fashion is in the air this week! Work Play Polish gets inspiration from Carolina Herrera's Fall 2013 Ready to wear line skirt to pull off this striped mani. 

"All of the polishes in the Zoya Cashmeres Collection are beautiful cremes in cozy fall colors."

Fall is a season of layering so why not layer your mani with some fun nail art using the Zoya Cashmeres and Satins collection! 


To find out which colors were used from the Zoya Cashmeres collection and how to get the look click here.


ZOYA IS THE NEW COLOR OF FASHION!
www.zoya.com

Monday, September 9, 2013

Challenge: Tone-on-Tone Stamping

Hello dear readers!

I did another manicure for FB group AiS. For Sunday September 1st, the theme of the challenge was tone-on tone which was pretty easy. I chose gray tones for this manicure because it's one of my favorite colors that I rarely get to wear.


I started with China Glaze - Pelican Grey as the base...

Then, I applied a layer of Spectraflair topcoat.
After that, I stamped a full nail design from plate XL M using Kleancolor - Charcoal for stamping.
(Kleancolor Charcoal doesn't work as a nail polish at all, takes ages to dry or slides off your nail...other than that... for stamping, it works flawlessly) ;)
Extra pic :)


 What do you think of this nail art?
As always...
♥♥Thank you so much for reading♥♥

Monday, September 2, 2013

How to do Nail Stamp Decals

Hello dear readers!

As I promised, here is the tutorial on how to make nail decals by using designs from nail art plates.
 
I will describe all the steps below the image.
Step1: Transfer your favorite image onto a nail stamper of your choice. I used a small soft stamper and  a bird design from Stamping plate XL M using Nabi black as my stamping nail polish.

Step2: With the design still on the stamper, paint inside the image using a small brush or with your nail polish brush. Nail polish or acrylic colors can be used. Let dry. *Cover the design using a clear topcoat and let dry. I used Out the Door fast dry top coat. it makes this process much faster ;)

Step3: Once the design is dry, peel off using tweezers (or in this case, my own nails).

Step4: Apply clear topcoat on your nail color base. This step is important so that the surface is sticky enough for the decal to stick on your nail. *Make sure to let dry the topcoat a little bit before applying the decal, it should be dry to the touch but a little bit sticky. Place the decal on your nail and smooth it out carefully to get rid of creases or air bubbles.

Step5: Apply clear topcoat to protect and give shine to your decal. You can add other details before applying topcoat.

I hope this tutorial will be useful to you and that you now will be able to try this nail art ;) 
If you have any questions, let me know by leaving a comment :)

♥♥Thank you so much for reading♥♥

Wednesday, August 28, 2013

Challenge: Stamping Over a Nude Base

Hello dear readers!

Last Sunday's challenge on FB group Adventures in Stamping was to do some stamping nail art on a nude base. I find this group very fun because it stimulates my creativity when I have no inspiration.

Well, here's what I came up with:
More details below....

The base color for this nail art was Palm Springs by American Apparel. Then I did some sponging using other lighter and darker nude tones to give more dimension to the background of my design.

For stamping polishes, I used:
-Sally Hansen Insta-Dri - Mint Sprint (leaves and foliage)
-Sally Hansen Insta-Dri - Presto Pink (Flowers)
-Sally Hansen Insta-Dri - Snappy Sorbet (Flowers on thumb)
-Pop Beauty - Thirty Seven Foggy (Light grey foliage)
-Nabi - Black (Feathers)
For designs, I used:
-XL R plate (Bird on thumb, flowers, big feathers)
-XL F plate (Small flowers, leaves on thumb)
-XL M plate (Big flowers and foliage on ring finger)
-QA23 (Vines on thumb and pinkie)
-A49 (Flowers and leaves on  index)
-m77 (Small feathers and flowers on pinkie)


Here's a detailed picture of what I did on my thumbnail using the stamping decal technique
*I will do a tutorial on this next week

 What do you think of this nail art?
Stay tuned for my tutorial on how to do a nail decal using a stamping design next Monday ;)

♥♥Thank you so much for reading♥♥

Wednesday, August 21, 2013

Tiger Print Nail Art

Hello dear readers!

This time I just did a simple tiger print on my nails... I'm not into animal prints... but I used a gold nail polish that was calling for something wild and I thought, why not?


I started with a nail polish by Icing called Golden Rule.
It is a gold color with foil finish and holographic micro glitter.
*You can see a 15 sec. video swatch of this nail polish here.

I stamped the tiger print with Kleancolor black using stamping plate QA25 
(Available for purchase in my online store)

As I said previously, looks a bit too wild for my taste especially on this nail lenght... Rawr!! But it's always good to try something different...

What do you think of this design? Too wild? :)
♥♥Thank you for reading♥♥


Monday, August 12, 2013

Nail Art Remake: Ice Cream and Candy Nails & Tutorial

Hello dear readers!

This time I decided to do an improved version of a nail art from last year (see it here).

The nail art you see now was what I had in mind originally, but 1yr. ago, I was either too busy or too lazy to do all the steps...
(Tutorial for this nail art below)

1.Once your nails are prepped with a basecoat, start by applying 1 or 2 layers of white nail polish. 
This is only the base for the pastel colors to look nice & bright.
 

2. Apply lines or dots of different pastel colors onto waxed paper, plastic or aluminum foil.

3.Using a nail stamper press it on top of the nail colors, twisting slightly so that the colors mix up a little bit. You will see the colors transferring to the stamper and ready to apply on your nails.
*You can also paint the pastel color lines directly on your nails with your nail polish brush, whichever is easier for you.

4. Stamp the colors from the stamper onto each nail.(Or paint each color with a nail polish brush). Let it dry.
Don't worry if it doesn't look perfect, it doesn't have to be ;)
My nails look like Easter eggs :D

5. Apply one coat of white crackle nail polish and let it dry to get the cracking effect. Apply clear topcoat to smooth out the nail surface and let dry.

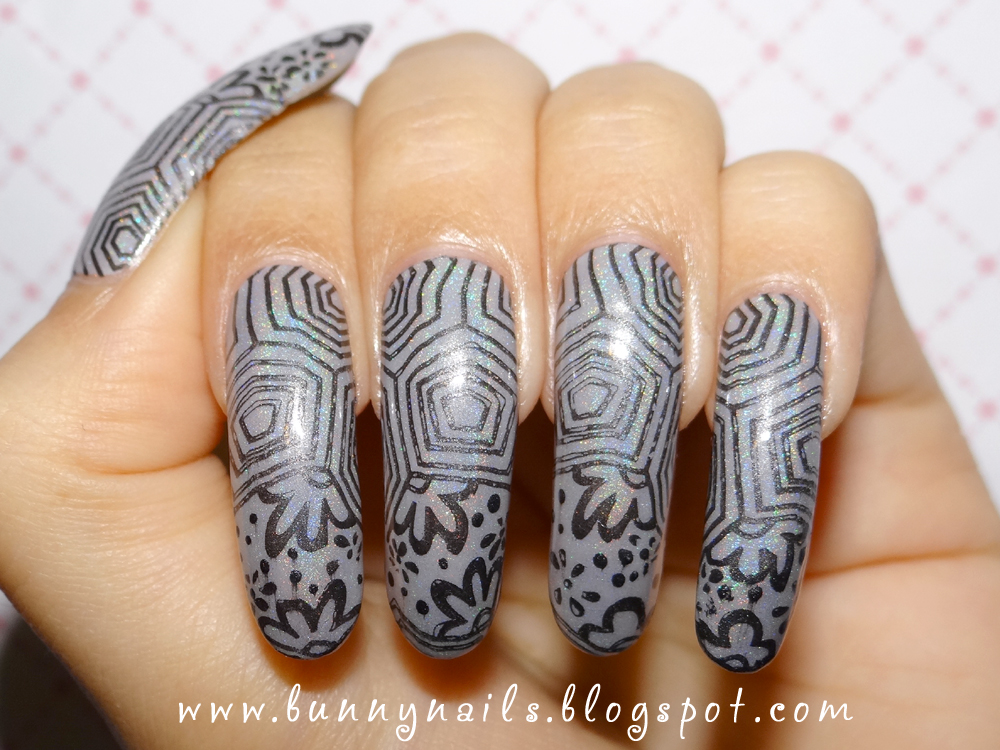
6. I used Konad's Q1 stamping plate and stamped the candy designs on my nails using Kleancolor black. You can use any other stamp plate design of your choice.
*There are other options for this nail art such as applying nail art stickers or by drawing freehand designs on your nails ;)

I hope you like this nail art tutorial and that it can be useful to you ;)


Which version do you like better? Last year's or this one?
♥♥Thank you so much for reading♥♥

Tuesday, July 30, 2013

My 1st Attemp at Water Marble Nail Art

Hello dear readers!

Today, I'm excited to show you my first attempt at water marbling :) I know I'm years too late to try this trend. In my case, this was not as easy as it seems... you have to choose the right nail polishes otherwise, you'll end up with a blob of polish on the bottom of the cup of water... it happened to to me before :'( and for this reason, I thought trying more would be a waste of time and precious nail polish.

I have to admit that I love to watch water marble YouTube videos (I find them relaxing for some strange reason). The whole process is fascinating and the end results amazing. I know this manicure is not spectacular as many other water marbles out there... but, bear with me... it's only my 1st attempt ;)

For this manicure, I used three China Glaze nail polishes from the Avant Garden collection: Passion for Petals, Fancy Pants and Dandy Lyin' Around. The base of this manicure is Passion for Petals as well. I found that most China Glaze nail polishes are good for water marbling.


As you can see, the swirls of nail polish are not as much. This is because I was experimenting and I just added a few drops of each color in case I failed... but in the end, I really like the randomness of the lines.
Have you tried water marbling? What do you think of my first attempt?
♥♥Thank you so much for reading♥♥

Thursday, July 25, 2013

Black Lace and French Manicure and How to

Hello dear readers:

The nail art I'm posting today is a remake of something I already did once before I started this nail blog. It is a combination of French manicure and lace. Details on how I did it below:


I started with one layer of basecoat. Using Kleancolor in black, I painted French tips using the nail polish brush. I didn't use adhesive guides this time. I think it looks better if I use my natural nail smile lines as my guide.

I stamped on top of the nail bed area with a lace pattern from A40 stamping plate using Kleancolor black as the stamping polish. I wanted to give this manicure a bit more glam so I added one layer of a glitter nail polish on top of the French tip.

What do you think of the combination of lace and French manicure?

♥♥Thank you so much for reading♥♥

Thursday, July 18, 2013

Holographic Skittle Manicure and Stamping

Hello dear readers!

This is my first post after my painful thumbnail breakage... as you can see, I managed to keep some length.

It's been months since I purchased my Color Club Halo Hues collection and still they were sitting unused in a dark corner of my nail polish drawer. This time I thought it was a good idea to put 5 of them to good use and do a skittle manicure.
 

The Color Club colors that I used are as pictured on the pic below from left to right:
 Cosmic Fate, Over the Moon, Kismet, Eternal Beauty, and Angel Kiss

I stamped a pattern from my Bunny Nails HD-A plate using Kleancolor black.

Both of my hands, can you believe I took this pic myself? :-)

What do you think of my attempt on the skittle manicure?
♥♥Thank you so much for reading♥♥

Tuesday, June 18, 2013

Chocolate dipped w/ Candy Nail Art & How To

Hello dear readers!

It's been a long time since I've done nail art...

So one day I was at San Francisco's Ichiban Kan store and stumbled upon the deco section. I saw all those candy deco parts and it occurred to me that I could use a little baggie of fake candy sprinkles on my nails and achieve a 3D type of nail art.

So here's the final result:
Note: Scroll down for instructions on how to do it yourself ;)
 

1. Start with a cream finish white or pastel colored nail polish as the base.
I used Orly - Cotton Candy

2. Use a dark brown nail polish or acrylic paint and paint on the tips of the nails as if you've dipped them in chocolate. The dripping effect depends on the length of your nails... there's no right or wrong way to do this. I used OPI - Suzi Says Da! for it's chocolate-like color.

3. I added little dots of clear nail polish and placed the fake candy sprinkles randomly.
*You can get these on Etsy, search for "deco fake candy sprinkles"
**You can also make these sprinkles yourself with polymer clay. I found a how-to video here.
***If you are not into 3D nail art, you can use acrylic paint or nail polish in pastel colors and draw little lines to emulate the small candy.

4. Apply 1 or 2 layers of clear topcoat to protect your nail art. I thought the candy parts would fall off right away, but I was wrong... they can last a week or more but believe me... it is not the most practical nail art to wear everyday... I had such a hard time washing my hair XD

Here's an extra pic that I posted on my Bunny Nails Facebook (feel free to add me) of me wearing this nail art.

What do you think of this nail art? Would you add the candy sprinkles or paint them instead?

♥ ♥Thank you so much for reading♥ ♥

Friday, March 29, 2013

Sakura Bunny

Hello dear readers!

Easter is a couple days away and I was planning nail art for this occasion. I was thinking about Easter eggs, peeps or chocolate bunnies. When I decided that I wanted to include bunnies into the design, the image of bunnies viewing cherry blossoms was the first thing that came to my mind. The Japanese culture lover that I am could not resist doing another nail art inspired in this beautiful symbol of  Japan

For those who may not know it, 花見 hanami (flower viewing) is a Japanese tradition in which people gather and eat under a cherry blossom tree to observe the ephemeral beauty of sakura. 

(Pictures can be enlarged)
Here's what I used for this nail art:
-Base: OPI Venus di Violet
-Stamping plates: XL O (for background) QA21 (tree branches) and HD A & B (bunnies)
-Stamping nail polishes: Ulta - Grape Escape, Kleancolor - Dark Brown and Verity - White
-Cherry blossom nail stickers
うさぎ花見

Falling in love...


I hope you like this manicure as much as I did ;)

♥♥Thank you so much for reading♥♥
opi nail color,nail polish colors,opi nail polish colors,opi nail colors,shellac nail colors,shellac nail colors,summer nail color,popular nail polish colors, fall nail colors,popular nail color,nails color,gel nail colors,winter nail colors,nails colors opi nail color,nail polish colors,opi nail polish colors,opi nail colors,shellac nail colors,shellac nail colors,summer nail color,popular nail polish colors, fall nail colors,popular nail color,nails color,gel nail colors,winter nail colors,nails colors