Showing posts with label ネイル. Show all posts

Monday, September 9, 2013

Challenge: Tone-on-Tone Stamping

Hello dear readers!

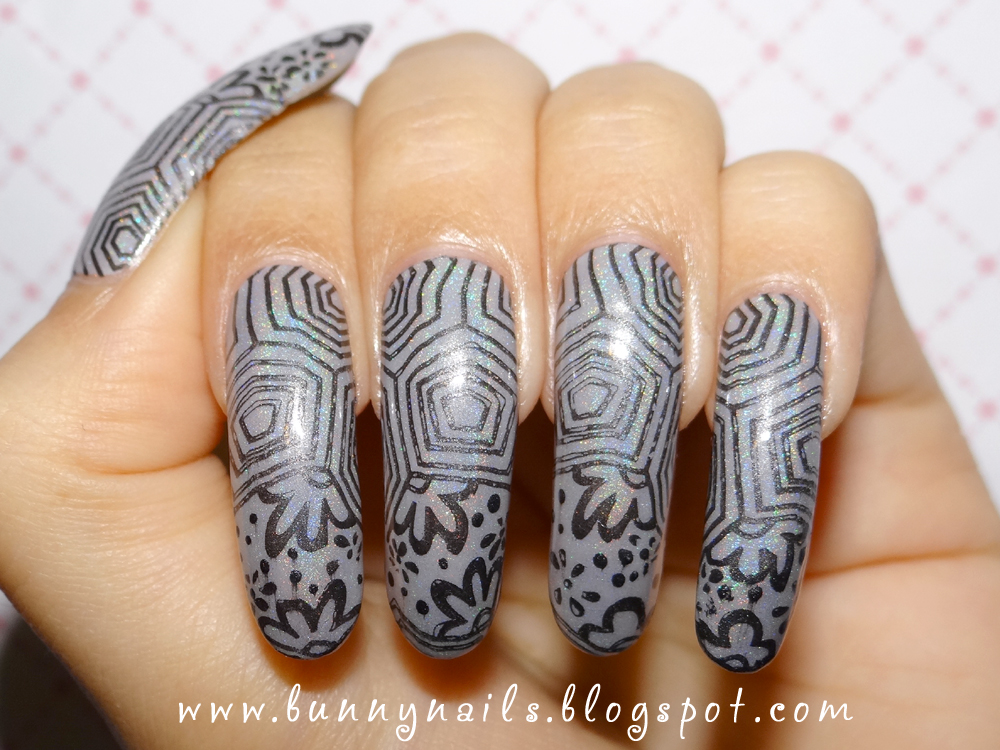
I did another manicure for FB group AiS. For Sunday September 1st, the theme of the challenge was tone-on tone which was pretty easy. I chose gray tones for this manicure because it's one of my favorite colors that I rarely get to wear.


I started with China Glaze - Pelican Grey as the base...

Then, I applied a layer of Spectraflair topcoat.
After that, I stamped a full nail design from plate XL M using Kleancolor - Charcoal for stamping.
(Kleancolor Charcoal doesn't work as a nail polish at all, takes ages to dry or slides off your nail...other than that... for stamping, it works flawlessly) ;)
Extra pic :)


 What do you think of this nail art?
As always...
♥♥Thank you so much for reading♥♥

Monday, August 26, 2013

American Apparel - Palm Springs

Hello dear readers!

I want to show you swatches of Palm Springs, a nail polish by American Apparel.


Palm springs is a peachy nude color with creme finish. The application was easy, though it was slightly streaky. The opacity of the formula made it easy to even it out by the second coat. The only thing I was not so happy about this nail polish was the drying time. It took longer even after applying Out the Door fast dry top coat.


Do you like the mannequin finish this type of nail polish color gives to nails?
Tomorrow This Wednesday, I'll show you the stamping nail art I did on top of this nail polish ;)
♥♥Thank you for reading♥♥

Wednesday, August 21, 2013

Tiger Print Nail Art

Hello dear readers!

This time I just did a simple tiger print on my nails... I'm not into animal prints... but I used a gold nail polish that was calling for something wild and I thought, why not?


I started with a nail polish by Icing called Golden Rule.
It is a gold color with foil finish and holographic micro glitter.
*You can see a 15 sec. video swatch of this nail polish here.

I stamped the tiger print with Kleancolor black using stamping plate QA25 
(Available for purchase in my online store)

As I said previously, looks a bit too wild for my taste especially on this nail lenght... Rawr!! But it's always good to try something different...

What do you think of this design? Too wild? :)
♥♥Thank you for reading♥♥


Monday, August 12, 2013

Nail Art Remake: Ice Cream and Candy Nails & Tutorial

Hello dear readers!

This time I decided to do an improved version of a nail art from last year (see it here).

The nail art you see now was what I had in mind originally, but 1yr. ago, I was either too busy or too lazy to do all the steps...
(↓ Tutorial for this nail art below ↓)

1.Once your nails are prepped with a basecoat, start by applying 1 or 2 layers of white nail polish. 
This is only the base for the pastel colors to look nice & bright.
 

2. Apply lines or dots of different pastel colors onto waxed paper, plastic or aluminum foil.

3.Using a nail stamper press it on top of the nail colors, twisting slightly so that the colors mix up a little bit. You will see the colors transferring to the stamper and ready to apply on your nails.
*You can also paint the pastel color lines directly on your nails with your nail polish brush, whichever is easier for you.

4. Stamp the colors from the stamper onto each nail.(Or paint each color with a nail polish brush). Let it dry.
Don't worry if it doesn't look perfect, it doesn't have to be ;)
My nails look like Easter eggs :D

5. Apply one coat of white crackle nail polish and let it dry to get the cracking effect. Apply clear topcoat to smooth out the nail surface and let dry.

6. I used Konad's Q1 stamping plate and stamped the candy designs on my nails using Kleancolor black. You can use any other stamp plate design of your choice.
*There are other options for this nail art such as applying nail art stickers or by drawing freehand designs on your nails ;)

I hope you like this nail art tutorial and that it can be useful to you ;)


Which version do you like better? Last year's or this one?
♥♥Thank you so much for reading♥♥

Tuesday, July 30, 2013

My 1st Attemp at Water Marble Nail Art

Hello dear readers!

Today, I'm excited to show you my first attempt at water marbling :) I know I'm years too late to try this trend. In my case, this was not as easy as it seems... you have to choose the right nail polishes otherwise, you'll end up with a blob of polish on the bottom of the cup of water... it happened to to me before :'( and for this reason, I thought trying more would be a waste of time and precious nail polish.

I have to admit that I love to watch water marble YouTube videos (I find them relaxing for some strange reason). The whole process is fascinating and the end results amazing. I know this manicure is not spectacular as many other water marbles out there... but, bear with me... it's only my 1st attempt ;)

For this manicure, I used three China Glaze nail polishes from the Avant Garden collection: Passion for Petals, Fancy Pants and Dandy Lyin' Around. The base of this manicure is Passion for Petals as well. I found that most China Glaze nail polishes are good for water marbling.


As you can see, the swirls of nail polish are not as much. This is because I was experimenting and I just added a few drops of each color in case I failed... but in the end, I really like the randomness of the lines.
Have you tried water marbling? What do you think of my first attempt?
♥♥Thank you so much for reading♥♥
opi nail color,nail polish colors,opi nail polish colors,opi nail colors,shellac nail colors,shellac nail colors,summer nail color,popular nail polish colors, fall nail colors,popular nail color,nails color,gel nail colors,winter nail colors,nails colors opi nail color,nail polish colors,opi nail polish colors,opi nail colors,shellac nail colors,shellac nail colors,summer nail color,popular nail polish colors, fall nail colors,popular nail color,nails color,gel nail colors,winter nail colors,nails colors